Skip to content
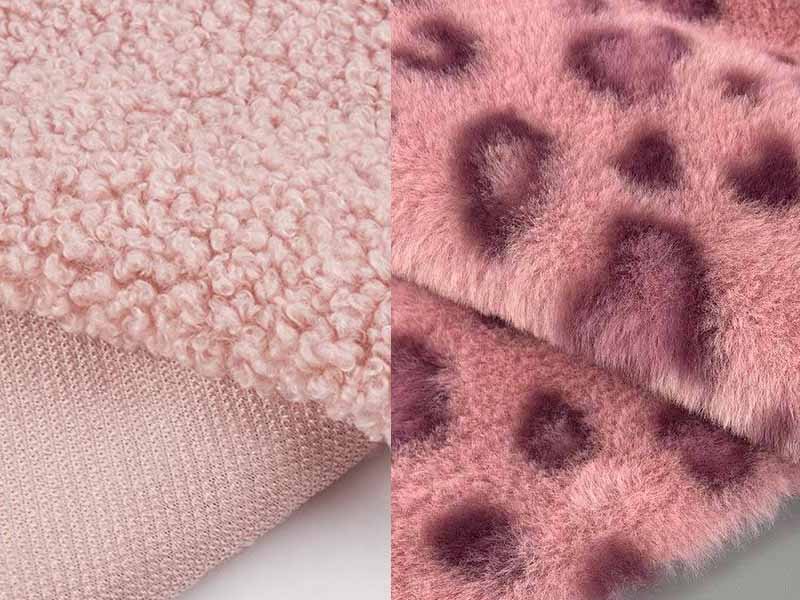
A plush product can look perfect on a screen and still fail when the artwork meets real fabric. Colors may appear darker after the pile is brushed. Tiny printed facial details can disappear between fibers. Stripes may break at seams, while a solid-color body can feel beautifully soft yet require too many panels to reproduce a complex character. For a brand developing a custom plush collection, choosing between printed and solid-color fabric is not a cosmetic decision. It affects design accuracy, hand feel, cutting efficiency, production cost, testing preparation, and the consistency of every unit that follows the approved sample.
Printed plush fabric is usually better for gradients, animal markings, repeated patterns, food graphics, and complex surface artwork. Solid-color plush fabric is usually better for clean character shapes, soft hand feel, embroidery, stable color blocking, and predictable bulk production. Many commercial plush products perform best with a hybrid construction that uses each material only where it adds real value.
The right answer depends on what must remain accurate after the fabric is cut, sewn, turned, stuffed, brushed, compressed into packaging, and shipped. In one development project, a spotted animal looked simple in the artwork. The first sample revealed the real problem: every major spot crossed a curved seam, and the character changed from each viewing angle. That moment captures the real choice. Material selection is not about deciding which swatch looks more attractive; it is about choosing a construction that can preserve the design through production.
What Is the Difference Between Printed and Solid Plush Fabric?

Printed plush fabric carries graphics, gradients, markings, or repeated patterns on the pile surface. Solid-color plush fabric uses one consistent visible color. Printing handles complex artwork more efficiently, while solid fabric usually supports cleaner color blocking, softer touch, easier cutting, and more predictable production.
Printed Plush Fabric
Printed plush fabric begins with a base textile – commonly short plush, velboa, minky, fleece, or another polyester-rich construction – and adds a decorative image or repeat to its surface. The design may include tiger stripes, leopard spots, scales, feathers, freckles, gradients, food textures, patterned clothing, camouflage, or fantasy-character skin. It is most valuable when the product needs more visual information than separate fabric pieces can reproduce efficiently.
Plush printing is not the same as printing on paper or a smooth jersey. The fibers move, overlap, catch light, and separate when the material stretches. A fine line that looks sharp in a vector file can become soft on a raised pile. Large readable shapes and controlled contrast generally survive production better than tiny lettering or delicate outlines. Artwork therefore needs to be evaluated at the actual toy size, on the intended textile, and after the fabric has been sewn and filled.
Solid-Color Plush Fabric
Solid-color plush fabric uses one primary visible color across a roll or dye lot. It can still vary greatly in pile height, density, sheen, stretch, and softness. A solid minky behaves differently from solid faux fur, even when both match the same color reference. Solid fabrics work especially well for characters built from distinct color zones: body, muzzle, belly, ears, hands, feet, clothing, and accessories.
This construction creates strong visual boundaries and supports embroidery or appliqué for smaller details. It is also easier to share materials across several SKUs. One black short plush may serve the eyes, shoes, ears, or accessories of an entire collection. That can simplify purchasing and reduce leftover material. Solid fabric still requires control: custom dyeing can create minimum requirements, dye lots can vary, and opposite pile directions can make two panels look like different shades.
Production Differences
The production route changes according to whether the design uses a random all-over print, an engineered-position print, or separate solid panels. A random repeat allows relatively flexible cutting as long as the pile direction remains correct. A positioned face, logo, stripe, or symmetrical marking must align with a defined area of the sewing pattern. That reduces nesting freedom and increases placement checks.
Solid fabric usually gives the cutting team more freedom, but it can increase the number of individual panels and material colors. Each additional color needs purchasing, identification, cutting, sorting, and sewing control. Printing can reduce those steps when one graphic replaces several fabric inserts. The practical comparison is therefore not simply printed versus plain; it is the total number of variables the finished design creates.
| Production Factor | Printed Plush Fabric | Solid-Color Plush Fabric |
|---|---|---|
| Main visual strength | Patterns, gradients, natural markings | Clean color blocks and tactile texture |
| Cutting flexibility | Lower for positioned graphics | Usually higher for plain panels |
| Artwork preparation | Print files, scale, repeat, color approval | Physical color and material approval |
| Seam risk | Medium to high for continuous graphics | Low for plain panels |
| Bulk control | Print lot, base textile, position | Dye lot, nap direction, panel matching |
| Detail methods | Print plus selective embroidery | Embroidery, appliqué, paneling |
| Typical strength | Realistic or complex surface artwork | Character bodies and defined color zones |
Base Material Compatibility
Printed and solid versions can use similar textile constructions, but not every base material displays artwork equally well. Short, dense, even piles usually produce the clearest graphics. Longer piles create softer edges because the fibers move over the printed image. Faux fur may be ideal for a mane or tail yet unsuitable for fine facial printing. Minky can remain very soft, but a strong nap may change the apparent brightness of the artwork from different angles.
Material approval should consider more than visible color. Useful checkpoints include fabric weight, pile height, density, pile direction, stretch, shedding, backing strength, colorfastness, embroidery performance, shape retention, and recovery after compression. The base fabric must first perform as a plush material; printing is only one layer of the finished-product decision.
Which Fabric Gives Better Design Accuracy?

Printed fabric is more accurate for gradients, irregular markings, repeated graphics, and complex surface artwork. Solid-color fabric is more accurate for silhouettes, strong color boundaries, embroidery, and panel-based character construction. Accuracy should be judged on the completed stuffed sample, because seams, curves, nap, and filling can change the original artwork.
Complex Artwork
Printing is usually more efficient when a design contains many small or irregular color changes. A realistic animal can have dozens of spots, shadows, and mottled areas. A fantasy creature may need scales and gradients. A food plush can require toasted shading, seeds, crumbs, icing, or package-inspired graphics. Rebuilding these effects through separate textile pieces adds seams, labor, thickness, and more opportunities for asymmetry.
The design still needs adaptation. Plush rewards readable shapes, not microscopic detail. A line that is visible on a 30 cm prototype may disappear on a 10 cm keychain. Recognition normally depends on a limited number of high-value features: eye spacing, mouth shape, head proportion, ear position, dominant markings, and overall silhouette. Preserving those features is more important than copying every line in the original illustration.
Character Construction
Solid fabrics are often the strongest foundation for cartoon characters, mascots, and licensed figures with clear color zones. Separate panels create clean boundaries around the face, belly, ears, hands, feet, shoes, and costume. Embroidery can then define eyes, eyebrows, mouths, logos, and other recognition-critical details. Because embroidery is anchored into the panel, it normally remains more stable than a printed feature positioned on a stretch-prone curved surface.
Printing becomes valuable when the character includes freckles, tattoos, patterned clothes, gradients, fur markings, or complex surface textures. The best construction may use solid minky for the head and body, embroidery for the expression, appliqué for a large symbol, and printed short plush for the clothing or wings. Assigning each feature to the method that reproduces it most reliably produces a more controlled result than forcing the entire toy into one decoration technique.
Stuffing and Distortion
A flat textile panel changes geometry after sewing and filling. Circles can become oval, straight stripes can bend, and a graphic placed near a seam can move inward. Distortion depends on fabric stretch, panel geometry, seam allowance, filling pressure, grain direction, and print location. A positioned face should therefore be mapped onto the actual sewing pattern rather than placed on a rectangular artwork board.
The approval sample also needs the intended production firmness. An underfilled sample may appear accurate because the panel is not under full tension. The same print can stretch differently when production units are filled more firmly. Critical facial details, logos, and symmetrical markings require tighter placement control than random spots or broad gradients. Before bulk production, the customer and manufacturer should agree which visual areas are critical and where natural variation is acceptable.
Seam Placement
Seams are one of the main reasons a printed design stops matching its flat artwork. The edges of each panel turn inward during sewing, so part of the graphic disappears within the seam allowance. Random textures tolerate this well. Continuous stripes, lettering, centered logos, and facial features do not. When a graphic must cross two curved panels, both sewing patterns need to be developed as a coordinated set.
Sometimes the technically ambitious solution is not the most commercial one. Moving a stripe away from the seam, increasing the size of a cheek mark, changing tiny text to a woven label, or converting printed eyes to embroidery can improve both appearance and repeatability. The goal is not perfect continuity on a flat pattern. It is a stable three-dimensional product that remains recognizable across the whole order.
| Artwork Type | Seam Risk | Practical Production Approach |
|---|---|---|
| Random spots or mottling | Low | Allow controlled natural variation |
| Broad gradients | Low to medium | Keep transitions wide and away from tight curves |
| Continuous stripes | High | Match panels, enlarge stripe, or relocate it |
| Printed eyes or mouth | High | Use engineered placement or embroidery |
| Small text | Very high | Enlarge, embroider, print on clothing, or use a label |
| Centered logo | High | Define a measurable placement tolerance |
| Mirrored markings | High | Use paired pattern control and early-unit checks |
How Do Pile and Printing Affect the Finish?

Pile height, density, direction, stretch, and fiber movement directly affect print clarity and touch. Short, even piles usually display graphics more sharply. Longer or looser piles can hide fine detail, expose the base textile, and make colors change as the fibers move. The completed stuffed toy should be the final approval standard.
Pile Height and Clarity
Pile height determines how far the visible fibers rise above the backing. The longer the fibers, the more they can overlap, separate, and cover printed edges. Short plush and velboa are commonly selected for detailed patterns because the surface behaves more predictably. Minky can balance clarity and softness, while long faux fur is normally chosen for volume and realism rather than fine graphics.
A practical development test is to brush the printed sample in several directions, bend it around a curved form, and view it from normal product distance. If a feature disappears whenever the pile is touched, it should not carry a recognition-critical role. Pile ranges are not absolute specifications – fiber fineness, density, backing, brushing, and the print method all change the result – but they provide a useful starting point for sampling.
| Pile Profile | Common Visual Result | Suitable Applications |
|---|---|---|
| 1-2 mm, dense | Highest relative print clarity | Small patterns, graphics, positioned details |
| 2-4 mm, soft and even | Balanced clarity and hand feel | Character bodies, animal markings |
| 4-6 mm, directional | Softer graphic edges | Broad patterns, decorative sections |
| Above 6-8 mm | Low fine-detail clarity | Manes, tails, realistic fur texture |
| Curly or irregular pile | Graphic edges break visually | Sherpa effects and simple color use |
Base Show-Through
Base show-through happens when the pile separates and reveals a lighter backing or less-colored lower fiber. It is most obvious when a dark print sits on a bright white base. The problem may be nearly invisible on a flat swatch and become obvious after the material is stretched over a forehead, cheek, belly, narrow limb, or tightly filled tail.
The risk depends on base color, print penetration, pile density, fiber length, stretch direction, filling firmness, and the contrast between the graphic and the underlying textile. Using a base shade closer to the dominant artwork can reduce the visual contrast. A small sewn test cushion filled to production firmness often reveals more than a flat swatch. The same check should be repeated after brushing and moderate compression, because packaging can temporarily disturb the pile.
Pile Direction
Pile direction changes the way light reflects from the textile. One panel can appear bright and glossy while the same material looks deeper when rotated 180 degrees. This effect applies to both printed and solid fabrics. With printed material, the nap can also change the visibility of graphic boundaries, making a shape look sharp from one angle and muted from another.
Cutting markers should identify a consistent direction for paired parts such as ears, arms, legs, cheeks, and wings. If one side is cut against the nap, the toy may appear mismatched even when the color value is identical. Designers can use directional contrast intentionally for a muzzle or belly, but the approved sample and production notes must make that intention clear. Final inspection should view the toy from several angles under consistent light, not only in a front-facing photograph.
Softness and Surface Feel
Printed plush is not automatically rough. The final hand feel depends on the base textile, surface coverage, printing process, curing, and the amount of color treatment applied. A light scattered print on soft minky can retain much of the original feel. A saturated full-coverage graphic may feel flatter or less flexible, especially in dark areas.
The correct question is whether the hand feel suits the product. A baby comfort toy, adult collectible, promotional mascot, and realistic animal do not need the same surface. A cuddle-focused product should prioritize softness and recovery. A display collectible may accept a slightly firmer surface when artwork accuracy drives the value. Material should be evaluated before printing, after printing, and after stuffing, because backing stiffness and filling pressure can change how the final toy feels in the hand.
Which Option Costs More in Production?

Custom printed fabric often costs more during material development because it may require artwork setup, color calibration, sampling, and a dedicated run. Solid fabric is usually more economical when suitable stock colors exist. However, custom dyeing, numerous panels, additional sewing, appliqué, and embroidery can make a solid-color construction equally expensive or more expensive.
Material and Setup Cost
Printed fabric can add artwork preparation, repeat creation, color adjustment, strike-off approval, custom textile production, and additional inspection before the first plush sample is completed. Solid fabric can avoid these steps when an acceptable stock color, pile, weight, and quantity are available. If the exact shade needs custom dyeing, the material may involve a dedicated run and similar approval work.
Price per meter is therefore an incomplete comparison. A printed body panel may cost more as textile but replace several appliqué pieces, color inserts, or embroidery areas. A solid construction may use lower-cost fabric yet require additional sewing and sorting. The useful measure is total finished-product cost: material, cutting, sewing, decoration, waste, revisions, testing, inspection, packaging, and the risk of rework. The cheapest swatch is not always the lowest-cost product.
Cutting and Waste
Random prints usually allow efficient nesting because pattern pieces can be placed wherever they fit within the fabric width, subject to nap direction. Positioned prints create more waste because a face, logo, stripe, or symmetrical marking must align with a specific graphic area. The cutting team may need to leave unused space between panels to maintain that alignment.
Solid materials generally offer more placement freedom, but a design using six or eight colors can require separate cutting runs and more sorting. Waste is affected by fabric width, panel shape, repeat size, graphic position, pile direction, symmetry, and defect allowance. Small design changes can have meaningful effects. Moving a marking 10-20 mm away from a seam, enlarging a repeat, or changing a directional pattern to a non-directional one may improve yield without changing the product’s identity.
MOQ and SKU Planning
The minimum for the finished plush toy and the minimum for a custom textile are not always the same. A project can meet the factory’s product MOQ but consume too little of one unique print or custom-dyed shade to use the material efficiently. This is common in multi-SKU collections where each character has one special fabric in a small area.
Material planning becomes easier when colors are shared across several characters, one print is used across a product family, stock colors are reserved for minor details, and custom textiles are used on larger body sections. Solid black, white, cream, brown, or primary colors can often serve several SKUs. A unique print is normally less reusable. One high-volume character may justify a dedicated print; a wide collection of lower-volume characters may benefit from a shared solid palette and selective printed accents.
Lead Time and Revisions
Custom printing normally adds time for artwork review, textile sampling, color approval, fabric production, and incoming inspection. Custom dyeing can create a similar schedule. Stock material is faster only when the exact color, pile, weight, performance, and quantity are actually available. Buyers should separate material-development time from finished-sample sewing time rather than treating them as one number.
A standard plush sample can often be constructed in about 5-7 days once approved materials and complete files are ready. More complex products commonly require 7-15 days, while standard bulk production is often planned around 20-30 days after sample approval, depending on material readiness, quantity, packaging, testing, and production scheduling. Late print revisions are particularly costly because a scale or placement change can require new textile. Approving the material, artwork, and fully stuffed sample before bulk production is the lowest-risk path.
How Are Quality and Safety Controlled?
Quality control should cover the base textile, color, print, nap direction, stretch, cutting position, sewing, filling, labels, and finished appearance. Safety depends on the target market, intended age group, construction, and materials. Printed and solid fabrics can both be suitable when they are correctly specified, tested, and controlled through production.
Incoming Fabric Inspection
Quality control begins when the rolls arrive. Printed fabric should be checked against the approved reference for color, repeat scale, missing areas, blur, uneven coverage, base show-through, usable width, pile direction, surface damage, and lot consistency. Solid fabric should be checked for dye-lot variation, pile height and density, weight consistency, stretch, shedding, backing quality, surface marks, and color-transfer risk.
Rolls from different lots should be identified and separated. Mixing visibly different shades within one toy can create mismatched ears, arms, cheeks, or body panels. Evaluation should take place under consistent lighting and with the nap oriented correctly. A color that looks acceptable under warm office lighting may appear different in daylight or under retail illumination. Material inspection records provide a traceable link between the approved sample and the production lot.
Print and Placement Control
Engineered prints need clear cutting references. The sewing pattern should show the intended graphic location, pile direction, seam allowance, orientation, and acceptable variation. Critical features include eyes, cheek marks, logos, text, symmetrical markings, and garment borders. These should be checked on the cut panel, after sewing, and again after filling because the apparent position can change at every stage.
Early production units are especially valuable. A graphic can look centered before sewing and shift after the seam is closed. Random prints require less position control, but the scale, density, color, and direction should remain consistent. Clear files, retained reference swatches, cutting records, and comparison with the approved sample form the practical control system. Cutting technology improves repeatability, but it cannot compensate for ambiguous artwork or a missing placement standard.
Colorfastness and Durability
Colorfastness describes how well a shade resists transfer or change under defined conditions. Relevant evaluation may include dry rubbing, wet rubbing, washing, moisture, light, or other conditions based on the target market and expected use. Printed and solid textiles can both transfer color. Dark red, navy, black, and other highly saturated shades deserve attention when they sit next to white or pale materials.
Practical development checks include rubbing the fabric with a clean light cloth, brushing the pile repeatedly, bending and stretching the textile, following the intended cleaning method, and inspecting the seam area after stuffing. These checks can identify obvious weaknesses but do not replace formal testing where regulations or retailer programs require it. Care labels should reflect the verified performance of the complete toy, including thread, filling, embroidery, accessories, and labels – not only the fabric supplier’s general washing claim.
Safety and Bulk Consistency
Printed fabric is not inherently unsafe, and solid fabric is not automatically safe. The final review considers fiber and backing composition, dyes or inks, finishes, small parts, seam strength, filling containment, embroidery, accessories, age grading, labeling, and packaging. The required test plan depends on the target country, intended user, toy classification, and product features. Projects for markets such as the United States, European Union, United Kingdom, Australia, or other regions should be reviewed before bulk production so materials and construction support the required compliance process.
The approved sample should become the physical production standard. A disciplined bulk process seals the approved sample and material swatches, records key dimensions and construction notes, confirms the production fabric lot, reviews initial units, inspects sewing and filling during production, and completes pre-shipment inspection. Delsney supports this process with 25+ engineers, 20+ QC staff, 18 production lines, sample approval controls, and 100% pre-shipment inspection. Compliance support can include preparation for EN 71, ASTM F963, CPSIA, CE, and coordinated third-party testing according to project needs.
Which Fabric Should You Choose for Your Plush Project?

Choose printed plush fabric when complex markings, gradients, repeats, or surface graphics drive recognition. Choose solid-color fabric when softness, clear color blocking, embroidery, material sharing, and production simplicity matter more. A hybrid solution is often strongest because different areas of one plush product may need different visual, tactile, and structural functions.
Character and IP Plush
For most cartoon and IP characters, solid fabric is the most stable structural foundation. It supports clear silhouettes, strong color zones, precise embroidery, and repeatable production. Printing should be used selectively for details that are inefficient to reproduce through paneling, such as freckles, tattoos, fur markings, costume patterns, gradients, or complex decorative surfaces.
Before sampling, identify the non-negotiable features that make the character recognizable. These may include eye distance, head-to-body ratio, mouth shape, signature colors, ear angle, logo position, or one dominant marking. The development team can then assign each feature to solid fabric, print, embroidery, appliqué, or an accessory. A successful plush interpretation does not copy every detail of the 2D artwork; it protects the features that carry identity and can be repeated in bulk.
Realistic, Baby, and Mascot Products
Realistic animals often use printed short plush for stripes, spots, scales, or mottled color, combined with faux fur for volume and movement. Solid fabric can define the muzzle, paws, belly, and inner ears. Pattern proportion, posture, muzzle structure, and stuffing distribution remain more important than adding extra colors. The fabric should support the animal’s anatomy rather than attempt to replace it.
Baby plush usually benefits from soft solid fabrics, simple panels, embroidered features, and carefully controlled accessories. Printing can be used when softness, wash performance, and age-related requirements are verified. Mascot plush commonly relies on bold solid colors for brand recognition, with printed fabric reserved for uniforms, sponsor graphics, sports textures, or animal markings. The material strategy should also work across planned sizes, because details suitable for a 35 cm mascot may need simplification on a 10 cm keychain.
Hybrid Material Strategy
A hybrid strategy is appropriate when one textile cannot provide every required function. Solid fabric can carry the shape and touch, printed fabric can carry complex surface information, faux fur can add realism, and embroidery can protect the expression. This is common in character plush with patterned clothing, realistic animals with markings, food plush with printed toppings, and fantasy creatures with scales or gradients.
The design should not become a catalog of materials. Every textile transition creates another seam, thickness change, stretch difference, sourcing task, and inspection point. A strong hybrid construction uses the smallest number of materials needed to achieve the intended result. Each additional textile should solve a clear visual, tactile, or structural problem that justifies the added production complexity.
Pre-Sampling Checklist
The final choice should be based on a complete product brief rather than one attractive swatch. Provide front, side, and back artwork where possible, vector files for prints and logos, physical references for critical colors, and close-up views of important details. The manufacturer also needs the target size, estimated order quantity, number of SKUs, market, age group, hand-feel requirement, filling firmness, washing expectation, packaging format, compliance needs, and delivery deadline.
The sample should answer practical questions: Does the face remain correct after filling? Does the printed base show when stretched? Do two materials pucker where they meet? Is the pile direction symmetrical? Does the toy recover after packaging compression? These questions turn sampling into production validation rather than a visual presentation exercise. The best fabric is the one that continues to look and feel right after every manufacturing step.
| Product Type | Preferred Material Strategy | Main Control Point |
|---|---|---|
| Cartoon character | Solid body with embroidery | Proportion, expression, and color blocks |
| Detailed IP figure | Hybrid solid and printed | Critical feature and print placement |
| Realistic animal | Printed short plush plus faux fur | Anatomy, nap flow, and texture transition |
| Baby plush | Soft solid material; limited verified print | Age grade, seam security, and wash performance |
| Corporate mascot | Solid colors with printed clothing | Brand-color and logo consistency |
| Food or novelty plush | Printed and solid combination | Graphic scale and final stuffed shape |
| Premium gift plush | Dense solid textures with selective print | Hand feel, sewing finish, and packaging |
| Multi-SKU collection | Shared solid palette with selective prints | Material use and repeat-order consistency |
Start Your Custom Plush Project with Delsney
The best plush fabric is not the one that looks most impressive in a sample book. It is the one that preserves the product’s identity after cutting, sewing, stuffing, testing, packing, shipping, and repeat production. Printed and solid fabrics are tools; the right construction uses each tool where it performs most reliably.
Printed plush fabric is the stronger choice for complex graphics, irregular markings, gradients, and repeated artwork. Solid-color plush fabric is usually stronger for softness, clean color blocking, embroidery, shared material planning, and straightforward production control. Many successful commercial plush products combine both.
Delsney is a B2B custom plush manufacturer in Guangdong, China, helping global brands, IP owners, retailers, gift companies, and e-commerce businesses turn artwork, characters, mascots, concepts, and reference samples into production-ready plush products. The company has 18+ years of plush manufacturing experience, 500+ skilled employees, 18 production lines, 25+ engineers, 10+ designers, and 20+ QC staff. Its service chain covers project review, material selection, pattern engineering, sampling, sample revision, bulk manufacturing, quality inspection, custom packaging, and global delivery.
The standard MOQ is 500 pieces. Standard samples generally take 5-7 days after materials and files are ready; complex samples commonly require 7-15 days. Standard bulk production is typically planned around 20-30 days after sample approval, with adjustments for material development, order quantity, testing, packaging, and production scheduling.