Skip to content
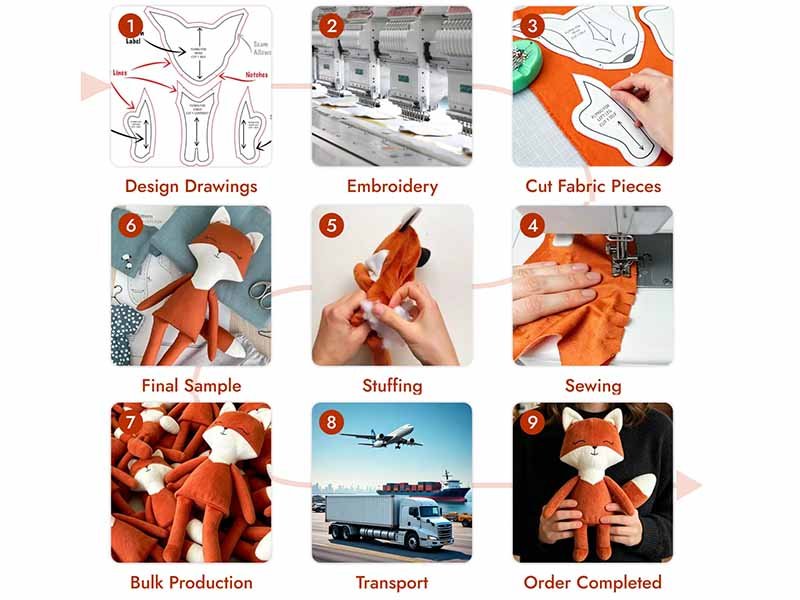
A plush toy can look simple when it reaches a store shelf: soft fabric, an expressive face, balanced proportions, and a shape that feels natural in the hand. Manufacturing one consistently is far more demanding. A factory must convert flat artwork into a three-dimensional body, choose fabrics that support the desired texture, build accurate patterns, position facial embroidery, control filling weight, secure small components, and reproduce the approved character across every production unit.
The plush toy manufacturing process begins with design review and product engineering. It then moves through three-view development, pattern making, material matching, prototype sampling, revisions, pre-production approval, fabric inspection, cutting, embroidery, sewing, filling, shaping, quality inspection, safety preparation, packaging, and delivery. Every stage affects appearance, softness, durability, compliance, cost, and bulk consistency.
A difference of only a few millimeters can change the expression of a character. Wider eye spacing may make a bear look younger. A higher eyebrow may create an angry face. Too much filling in the muzzle may hide the smile. Too little filling in the neck may make the head lean forward.
For one project, the supplied artwork showed a cheerful mascot from the front. No side or rear view existed. Before the first seam was sewn, the development team had to decide head depth, ear thickness, tail position, limb angle, clothing closure, label placement, and sitting balance. Those hidden decisions determined whether the final toy looked like the original character or merely shared the same colors.
What Is the Plush Toy Manufacturing Process?

The plush toy manufacturing process is a controlled production sequence that turns artwork, technical files, photographs, or physical samples into repeatable finished products. It covers product planning, design engineering, pattern development, material selection, sampling, cutting, decoration, sewing, filling, shaping, inspection, compliance preparation, packing, and shipment.
A plush project should not begin with sewing. The first stage is product definition. The factory needs to know how the toy will be used, who will use it, where it will be sold, how large it should be, how soft it should feel, and what quantity is planned.
A 15 cm promotional mascot requires a different construction from a 45 cm weighted comfort toy. A baby plush needs different component choices from a collectible display character. A sitting animal needs a stable lower body, while a standing character may require firmer legs, a wider foot base, or internal structural support.
Important information collected before development includes:
- Character artwork or physical reference
- Finished size and measurement method
- Sitting, standing, lying, or flexible pose
- Target age group
- Destination market
- Preferred fabric texture
- Filling firmness
- Logo and label requirements
- Clothing and accessories
- Sound, light, scent, or weighted functions
- Packaging format
- Estimated order quantity
- Color and SKU breakdown
- Planned delivery date
Missing information does not always stop development, but every unanswered point must eventually be decided. When decisions are delayed until sampling, revision time and development cost usually increase.
A complete production route can be divided into the following control stages:
| Production Stage | Main Decisions | Main Output |
|---|---|---|
| Product definition | Size, use, age group, market, quantity | Development brief |
| Design engineering | Proportion, pose, hidden angles, details | Three-view drawing or 3D visual |
| Pattern making | Panels, curves, seams, pile direction | Sewable pattern set |
| Material selection | Fabric, filling, embroidery, accessories | Approved material plan |
| Prototype sampling | Shape, size, expression, softness | First physical sample |
| Sample revision | Measured changes and corrections | Approved sample |
| Pre-production setup | BOM, color references, instructions | Bulk production standard |
| Fabric cutting | Panel size, direction, shade control | Numbered cut bundles |
| Decoration | Embroidery, printing, appliqué, labels | Finished flat components |
| Sewing | Head, body, limbs, accessories | Sewn shells |
| Filling and shaping | Filling weight and distribution | Final three-dimensional form |
| Inspection | Size, seams, face, function, cleanliness | Accepted finished products |
| Compliance preparation | Labels, tests, records, traceability | Market-ready documentation |
| Packing and shipment | Bag, box, carton, shipping marks | Delivery-ready order |
Each stage is connected to the next. Fabric stretch can change the final dimensions. Embroidery backing can stiffen the face. Filling density can increase carton volume. Long fur can cover small embroidered details. Packaging pressure can flatten ears or deform a muzzle.
A reliable factory reviews those connections before bulk production rather than correcting them after defects appear.
How Are Plush Toys Made?
Plush toys are made by dividing a three-dimensional character into flat fabric pieces. Those pieces are cut, decorated, sewn into partial assemblies, turned to expose the finished fabric surface, filled to a controlled weight and firmness, shaped by hand, closed, groomed, inspected, and packed.
The production sequence is planned according to the character structure. Facial embroidery is normally completed while the fabric panel remains flat. Inner ears, paw pads, belly panels, hair pieces, clothing parts, and woven labels must also be attached at specific stages.
A common production sequence includes:
- Inspect and relax the fabric.
- Confirm pile direction and color shade.
- Spread and cut the fabric panels.
- Group panels into numbered bundles.
- Apply embroidery, printing, or appliqué.
- Sew small components such as ears and tails.
- Assemble the head and facial structure.
- Assemble the body, arms, and legs.
- Join the head and body where required.
- Turn the sewn shell.
- Add filling by area and weight.
- Adjust the face, limbs, and posture.
- Close the filling opening.
- Brush fur away from seam lines.
- Trim thread and clean the surface.
- Inspect dimensions, appearance, and function.
- Perform needle control and metal detection where required.
- Pack according to the approved method.
The order matters. If a woven label is forgotten before a side seam is closed, the product may need to be opened and sewn again. If embroidery is completed after a curved facial panel is assembled, positioning becomes less stable.
Industrial equipment improves speed and consistency, but plush manufacturing still depends heavily on skilled handwork.
Which Steps Shape the Final Toy?
Pattern making, fabric selection, facial placement, seam control, and filling distribution have the strongest influence on the final shape. Errors made in those areas cannot be fully hidden during final finishing.
The head usually receives the greatest attention because facial proportions determine character recognition. The following measurements can noticeably change expression:
| Facial Detail | Small Change | Possible Visual Result |
|---|---|---|
| Eye spacing | 2–4 mm wider | Younger or softer expression |
| Eye height | 2–3 mm higher | Longer lower face |
| Eyebrow angle | 3–5 degrees | Happy, worried, or angry look |
| Nose position | 2–4 mm lower | Longer muzzle appearance |
| Mouth curve | Minor curve change | Different emotional expression |
| Ear angle | 5–10 degrees | Alert or relaxed posture |
| Muzzle filling | Small weight change | Fuller or flatter face |
The acceptable change depends on toy size. A three-millimeter shift may be minor on a 60 cm mascot but highly visible on a 12 cm keychain plush.
Body shape is controlled by panel curves, seam position, filling density, and center of gravity. A seated toy needs enough lower-body volume to remain upright. A large head requires neck and torso support. Long legs may bend unless filling and seam structure are carefully managed.
Production teams should inspect the character from several views:
- Front view for expression and symmetry
- Side view for head depth and posture
- Rear view for seam balance and tail position
- Top view for ear and eye alignment
- Bottom view for sitting stability
- Loaded packaging view for shape retention
The approved sample should be judged as a complete character, not as a collection of isolated measurements.
Is Plush Production Handmade?
Plush manufacturing combines machinery with substantial manual work. Cutting equipment, embroidery machines, sewing machines, filling systems, weighing tools, and metal detectors support production, but operators still control many stages by hand.
Plush fabric creates challenges that ordinary woven materials do not. Long pile can hide seam lines. Stretch fabric can move during sewing. Slippery minky can shift between panels. Faux fur must be brushed out of seams after assembly.
Manual work is often required for:
- Aligning curved fabric panels
- Turning narrow arms, ears, horns, and tails
- Distributing filling around the face
- Shaping cheeks and muzzles
- Adjusting limb symmetry
- Closing filling openings
- Brushing fur from seams
- Dressing the toy
- Positioning accessories
- Removing loose fibers
- Checking facial expression
Filling is not simply poured into the body. Different areas may need different firmness levels.
| Body Area | Common Filling Goal |
|---|---|
| Head | Firm enough to hold facial shape |
| Muzzle | Controlled firmness for projection |
| Neck | Supportive enough to hold the head |
| Belly | Softer for comfort and hand feel |
| Arms | Flexible or medium firmness |
| Legs | Firm enough for posture |
| Tail | Light filling to avoid pulling the body |
| Weighted section | Even pellet or bead distribution |
A toy filled uniformly may feel hard in the belly and weak in the neck. Experienced filling staff adjust density by section while maintaining the approved total weight.
Plush production remains labor-intensive because appearance and softness rely on human judgment at several points.
How Does OEM/ODM Production Work?
OEM production normally begins with developed artwork, technical specifications, an existing product, or a physical sample. The factory converts the supplied information into patterns, materials, prototypes, and bulk production instructions.
ODM production includes more product-development support. A project may start from a logo, rough sketch, mascot concept, single character image, written idea, or incomplete design. The factory helps define proportions, hidden angles, materials, functions, accessories, packaging, and production methods.
Delsney supports several starting formats:
| Project Input | Development Support |
|---|---|
| Complete technical pack | Specification review and sample production |
| Front, side, and rear artwork | Pattern making and material mapping |
| Single character image | Hidden-angle development and three-view design |
| Physical reference sample | Measurement, reconstruction, and improvement |
| Rough hand sketch | Character refinement and structural proposal |
| Logo or company mascot | Original plush concept development |
| 3D render | Conversion into sewable fabric panels |
| Existing plush needing improvement | Shape, material, quality, or cost adjustment |
| Multi-character collection | Shared sizing, fabric, color, and packaging control |
An OEM/ODM project usually covers:
- Design review
- Three-view drawing
- 3D effect visualization
- Pattern development
- Fabric and filling selection
- Facial embroidery development
- Prototype sampling
- Two sample revisions
- Pre-production confirmation
- Custom labels
- Custom logo application
- Clothing and accessories
- Retail packaging
- Bulk production
- Quality inspection
- Export packing
Delsney has more than 18 years of experience in plush product research, design, pattern making, sampling, manufacturing, and sales. Standard plush samples can usually be developed in 5–7 days after materials and specifications are confirmed. Complex products involving molded parts, special structures, electronics, layered clothing, or uncommon materials may require 7–15 days.
Flexible MOQ arrangements are reviewed according to product size, material availability, SKU count, packaging, and manufacturing complexity. A single character in one fabric color is easier to arrange than a collection containing several characters, many fabrics, custom accessories, and separate packaging designs.
The goal of development is not merely to make one attractive sample. The approved design must also be stable enough for repeat production. Delsney uses three-view drawings, 3D effect support, physical samples, measured revision records, and approved production references to reach up to 98% visual matching between the confirmed design direction and the finished plush product.
How Is a Plush Toy Designed?

A plush toy is designed by converting character artwork into measurable three-dimensional forms, sewable fabric panels, material zones, embroidery positions, filling requirements, and production instructions. Development normally includes design review, proportion planning, three-view creation, 3D visualization, material mapping, pattern making, and physical sample verification.
Illustrations do not contain seam allowances, fabric thickness, filling pressure, pile direction, or gravity. A perfectly round cartoon head may need four, six, or more fabric panels to create the correct volume. Thin fingers may be too narrow to turn after sewing. Sharp graphic corners may become soft curves when made from plush fabric.
The first design task is identifying the character features that must remain unchanged.
Those features may include:
- Eye size and distance
- Nose shape
- Mouth curve
- Ear length
- Head-to-body ratio
- Hair silhouette
- Tail shape
- Clothing
- Signature color blocks
- Brand logo
- Special accessories
- Sitting or standing pose
Other details may be simplified to improve durability, sewing stability, safety, cost, or visual clarity at a small size.
A character intended for several sizes may require separate patterns. Reducing a 40 cm plush pattern directly to 12 cm often creates parts that are too narrow to sew or turn. Facial embroidery may also need redrawing because line thickness and spacing change at smaller scales.
The following design decisions should be confirmed before pattern development:
| Design Item | Required Decision | Production Risk |
|---|---|---|
| Finished size | Measurement points and tolerance | Size disagreement |
| Pose | Sitting, standing, lying, or flexible | Poor balance |
| Head proportion | Width, height, and depth | Character mismatch |
| Facial layout | Eye, nose, mouth, eyebrow positions | Changed expression |
| Fabric | Type, pile, stretch, and color | Shape and texture problems |
| Filling | Soft, medium, firm, or zoned | Incorrect hand feel |
| Accessories | Fixed, removable, or separate | Safety and durability concerns |
| Labels | Content, size, and position | Late production changes |
| Clothing | Removable or attached | Fit problems after filling |
| Packaging | Flat, compressed, boxed, or displayed | Shape deformation |
Clear design decisions reduce repeated sampling and help quotation accuracy.
What Design Files Are Needed?
A factory can begin with many kinds of design material, but complete and clear files shorten development time and reduce interpretation errors.
Useful files include:
- Front artwork
- Side artwork
- Rear artwork
- Top view where needed
- Character size chart
- Color references
- Vector logos
- Facial artwork
- Clothing artwork
- Accessory drawings
- Label content
- Packaging layout
- Material preferences
- Existing sample photographs
- 3D models or renders
Preferred artwork formats include AI, EPS, SVG, editable PDF, PSD, high-resolution PNG, and high-resolution JPG. Vector files are especially useful for embroidery, printing, labels, and packaging because lines can be resized without losing clarity.
A single low-resolution screenshot may leave several details unclear:
- Exact eye shape
- Embroidery line thickness
- Color boundaries
- Small logos
- Rear construction
- Tail attachment
- Clothing closure
- Accessory dimensions
When only one image is available, Delsney can help create missing views. The development team will still need approval for decisions that cannot be seen in the original artwork.
A useful first inquiry should include the intended size, quantity, destination market, target age, fabric preference, desired softness, packaging, and planned delivery date.
How Are 2D Designs Converted?
A two-dimensional design is converted by defining how every visible shape continues around the side, rear, top, and bottom of the character. Front artwork may show the face clearly while providing no information about head depth, ear thickness, back markings, tail angle, or limb position.
The design team first identifies the main volumes:
- Head
- Muzzle
- Torso
- Arms
- Legs
- Ears
- Tail
- Hair
- Clothing
- Accessories
Each volume is divided into flat panels that can be cut and sewn. Curved shapes may require center seams, side panels, gussets, darts, or separate inserts.
Not every artwork line should become a seam. Fine details may be produced more accurately through:
- Embroidery
- Printing
- Appliqué
- Short-pile fabric
- Fabric color blocking
- Woven labels
- Felt pieces
- Small sewn patches
Too many panels raise sewing time and alignment risk. Too few panels can flatten the character and remove important volume.
The conversion process balances four goals:
- Preserve character recognition.
- Create sewable patterns.
- Maintain bulk-production consistency.
- Control material and labor cost.
A good plush interpretation does not copy every line literally. It preserves the visual features people recognize while adapting the character to fabric, seams, filling, and real-world use.
Do 3D Previews Improve Accuracy?
Three-dimensional previews help teams evaluate head depth, posture, hidden angles, accessory placement, and overall proportion before physical sampling begins. They are especially valuable when only front artwork is available.
A 3D effect can reveal:
- A head that appears too flat from the side
- Ears positioned too far back
- A tail attached too high
- Arms that interfere with clothing
- Legs that cannot support a standing pose
- Accessories that look oversized
- Clothing that does not wrap naturally around the body
Three-view drawings and 3D visuals also help several departments approve the same direction. Design, product, marketing, sourcing, and management teams can review one shared visual reference before sample production.
Digital previews do not replace physical samples. Digital models do not fully represent fabric stretch, seam thickness, pile direction, embroidery backing, filling pressure, or softness.
Delsney combines front, side, and rear drawings with 3D effect support and physical sample development. Digital approval reduces guesswork. The sewn prototype then confirms hand feel, weight, balance, facial expression, material appearance, seam location, clothing fit, and packaging performance.
How Is a Plush Pattern Made?
A plush pattern is made by dividing the character into flat fabric pieces that create the required form after sewing and filling. Pattern makers define panel shapes, curves, darts, gussets, notches, seam allowances, embroidery references, fabric direction, pile direction, and filling openings.
Different fabrics require different pattern adjustments. A pattern created for stretchy minky may become too narrow when used with non-stretch cotton. Long faux fur may soften edges and make small shapes appear larger. Dense short-pile fabric may hold a sharper silhouette.
Pattern controls include:
- Left and right symmetry
- Matching notches
- Seam allowance
- Fabric grain
- Pile direction
- Embroidery position
- Appliqué location
- Turning opening
- Filling opening
- Reinforcement points
- Accessory attachment
- Label position
- Sitting base
- Joint position
The first pattern is tested through a sewn prototype. After filling, the pattern maker compares the result with the artwork and measurements.
Common pattern revisions include:
| Sample Problem | Pattern Adjustment |
|---|---|
| Head too narrow | Increase side-panel width |
| Face too flat | Increase muzzle or front projection |
| Ears lean backward | Change ear-base angle |
| Body falls forward | Adjust base and filling distribution |
| Legs twist | Correct matching points and grain direction |
| Neck feels weak | Reduce opening or add support |
| Tail pulls the body | Reduce tail weight or change attachment |
| Clothing feels tight | Add wearing ease |
Pattern development continues until the approved sample has the required shape, expression, balance, and production stability.
Which Details Affect Shape?
The final plush shape is controlled by pattern geometry, fabric stretch, pile length, seam allowance, sewing tension, embroidery backing, filling material, filling weight, and hand shaping.
A change in one area can affect several other areas. Dense facial embroidery can pull the fabric inward. Adding more filling may restore the surface but push the eyes farther apart. Moving the eyes inward may then change the expression.
High-impact shape controls include:
| Control Point | Effect on the Finished Plush |
|---|---|
| Head center seam | Forehead curve and rear-head volume |
| Side head panel | Face width and profile |
| Muzzle gusset | Nose projection and mouth shape |
| Eye distance | Character age and emotion |
| Ear base | Ear direction and stability |
| Neck opening | Head support |
| Shoulder seam | Arm angle |
| Hip panel | Sitting balance |
| Bottom gusset | Base width and stability |
| Fabric stretch | Finished width and height |
| Filling weight | Firmness and measurements |
| Pile length | Visible silhouette |
Filling specifications should include more than total toy weight. The factory may need separate guidance for the head, muzzle, neck, belly, limbs, tail, and weighted areas.
Delsney records approved dimensions, fabric references, embroidery locations, filling requirements, seam construction, labels, accessories, and packaging details after sample approval. The confirmed sample and production file become the working standards for bulk manufacturing, helping the final order maintain the intended character appearance.
How Is a Plush Sample Made?
A plush sample is made by combining the approved design direction with real fabric, embroidery, patterns, filling, accessories, and sewing construction. The sample confirms whether the character looks correct from every angle, feels right in the hand, remains balanced, and can be reproduced consistently during bulk production.
Sampling is the stage where assumptions become visible. Artwork may suggest a certain head shape, but fabric stretch and filling pressure can produce a wider or flatter result. A digital color may also look different when applied to long-pile fabric, short-pile minky, felt, embroidery thread, or printed cloth.
A reliable sample process checks more than appearance. It should confirm:
- Finished dimensions
- Character proportion
- Fabric texture
- Color matching
- Facial expression
- Embroidery position
- Filling firmness
- Sitting or standing balance
- Seam location
- Accessory attachment
- Label position
- Clothing fit
- Product weight
- Packaging fit
- Production feasibility
The first sample is rarely judged only as “good” or “bad.” Each area should be measured and recorded. A head may need 5 mm more width, an ear may need a 7-degree angle change, or a mouth line may need to move 3 mm downward. Clear measurements help the sample room make controlled changes.
Delsney supports standard sample development in 5–7 days after the necessary materials and specifications are confirmed. More complex projects involving electronics, special fillings, molded parts, layered clothing, unusual fabrics, or advanced structures may require 7–15 days. Two sample revisions can be provided to refine shape, expression, materials, or construction.
Which Plush Materials Work Best?
Material selection should follow the intended use, character style, target age, retail position, and destination market. The softest-looking fabric is not always the best production choice. A long pile may hide embroidery, while a very stretchy fabric may make dimensions harder to control.
Common plush fabrics include:
| Material | Surface Character | Main Strength | Main Limitation |
|---|---|---|---|
| Short-pile plush | Smooth and controlled | Good for detailed shapes and embroidery | Less fluffy appearance |
| Minky | Soft and slightly stretchy | Comfortable hand feel and rich colors | Can shift during sewing |
| Velboa | Short pile and stable | Good printing and clean surface | Lower loft than plush fur |
| Faux fur | Long and textured | Strong visual volume | Can hide seams and small details |
| Fleece | Soft knitted surface | Lightweight and economical | Less premium for some projects |
| Sherpa | Curly textured surface | Warm and tactile | Difficult for small facial details |
| Cotton fabric | Woven and natural | Useful for clothing and mixed-material designs | Less plush hand feel |
| Recycled plush | Varies by construction | Supports sustainability goals | Color and texture availability may vary |
| Organic cotton components | Natural and soft | Suitable for selected baby-focused products | Higher material cost |
Fabric pile direction must be controlled. When two face panels are cut in opposite directions, reflected light can make them appear to be different colors. Hair, ears, tails, and body sections may also need different pile directions to create the intended visual flow.
Filling options can include:
- Virgin polyester fiber
- Recycled polyester fiber
- PP cotton
- Foam pieces
- Weighted plastic pellets
- Glass beads where appropriate
- Memory foam particles
- Scented inserts
- Sound modules
- Vibration components
Weighted filling needs an internal bag or compartment so pellets remain contained and evenly positioned. Sound and light modules need suitable openings, wiring protection, and access planning. Material selection should therefore be confirmed together with structure and function.
How Is the First Sample Built?
The first sample starts after the design, size, fabric, and main construction direction are agreed. The pattern maker prepares the initial set of paper or digital patterns, including seam allowances, matching marks, pile direction, embroidery position, and filling openings.
The sample room then follows a controlled sequence:
- Cut the selected fabric by hand or with sample-cutting equipment.
- Mark embroidery and appliqué locations.
- Complete facial embroidery or printing.
- Sew small parts such as ears, tails, horns, and paws.
- Assemble the head and muzzle.
- Assemble the body and limbs.
- Join major sections.
- Turn the sewn shell.
- Add filling in stages.
- Shape the face, neck, body, and limbs.
- Close the filling opening.
- Dress the toy where clothing is included.
- Clean, groom, and measure the sample.
- Compare it against the drawing and specification.
The first sample should be treated as an engineering prototype. It may reveal that a fabric is too stretchy, a head is too heavy, or a garment cannot be dressed easily after filling. Those findings are useful because they prevent the same problem from entering bulk production.
Delsney can prepare front, side, and rear reference views before sample sewing. A 3D visual can also help confirm proportion and hidden angles, reducing the amount of guesswork in the first prototype.
What Should a Sample Check?
A plush sample should be checked from visual, functional, dimensional, material, and production perspectives. Approval based only on a front photograph can miss problems that become obvious when the sample is handled.
A sample review should include:
| Review Area | What to Check |
|---|---|
| Front view | Eye level, face symmetry, mouth, nose, ear position |
| Side view | Head depth, muzzle projection, posture |
| Rear view | Back seams, tail, labels, clothing closure |
| Dimensions | Height, width, depth, limb length |
| Weight | Total weight and filling distribution |
| Touch | Softness, firmness, fabric hand feel |
| Balance | Sitting or standing stability |
| Embroidery | Position, density, thread color, clean edges |
| Seams | No twisting, puckering, gaps, or exposed edges |
| Accessories | Attachment strength and alignment |
| Clothing | Fit, ease, closures, and appearance |
| Packaging | Compression, shape retention, display fit |
The face should be reviewed at the intended viewing distance. A tiny adjustment that looks minor in a close-up may become highly visible in retail photography or on a shelf.
The sample should also be tested under normal handling. Arms, ears, tails, and accessories should be moved gently. The zipper, pocket, removable clothing, sound unit, or other function should be operated several times. The sample should remain stable after being placed in its planned packaging.
How Are Sample Changes Made?
Sample changes should be written in measurable language. Comments such as “make it cuter” or “improve the face” are difficult to execute consistently. A better comment identifies the exact feature, direction, and amount of change.
Examples include:
- Reduce head width by 8 mm.
- Move both eyes 3 mm inward.
- Lower the nose by 2 mm.
- Increase ear length by 6 mm.
- Add 10 g more filling to the neck.
- Reduce belly firmness.
- Move the tail 12 mm upward.
- Shorten the left and right arms by 5 mm.
- Change the body fabric from 3 mm pile to 5 mm pile.
- Increase the logo embroidery width from 28 mm to 32 mm.
A revision sheet can be used to keep decisions clear:
| Item | Current Result | Required Change | Approval Status |
|---|---|---|---|
| Head width | 125 mm | Reduce to 117 mm | Pending |
| Eye spacing | 42 mm | Reduce to 36 mm | Approved |
| Ear angle | Too far backward | Rotate forward 7 degrees | Approved |
| Belly filling | Too firm | Reduce by 15 g | Pending |
| Tail position | Too low | Raise by 12 mm | Approved |
Only one consolidated revision file should guide the next sample. Conflicting comments from several departments can create confusion and slow the process.
Delsney provides two free sample revisions for suitable projects. Revision work can cover pattern changes, embroidery position, fabric choice, filling density, accessory placement, or packaging fit.
How Is Design Accuracy Controlled?
Design accuracy is controlled by comparing the sample against approved drawings, measurements, color references, material samples, embroidery files, and physical approval standards. Visual similarity alone is not enough; important proportions and positions should be measured.
Key controls include:
- Head-to-body ratio
- Eye distance
- Nose and mouth position
- Ear angle
- Limb length
- Body width
- Total height
- Tail position
- Logo size
- Fabric color
- Filling weight
- Product weight
- Clothing dimensions
- Label position
A useful accuracy system combines three types of references:
- Visual reference: three-view drawings, 3D visual, and artwork.
- Measured reference: dimension chart and approved tolerances.
- Physical reference: confirmed sample and approved material swatches.
The physical sample becomes especially important for hand feel, softness, facial volume, and fabric appearance. Those qualities are difficult to define with numbers alone.
Delsney records the approved sample structure and measurements before bulk production. The confirmed sample, material references, embroidery file, BOM, and filling requirements are used together to support up to 98% matching between the intended design and finished plush products.
How Are Plush Toys Mass-Produced?

Mass production begins after the sample, materials, measurements, artwork, labels, and packaging are approved. The factory prepares bulk fabric, production patterns, cutting plans, embroidery files, sewing instructions, filling standards, inspection points, and packing requirements. The goal is to reproduce the approved sample consistently across every unit.
A single approved sample may be made by one experienced technician. Bulk production is different because many operators and workstations are involved. Each operator must follow the same construction standard. Production instructions therefore need to be clear, measurable, and easy to inspect.
A pre-production file may include:
- Approved sample photographs
- Finished measurements
- Pattern version
- Fabric code and color
- Pile direction
- Embroidery file
- Printing artwork
- Thread colors
- Seam allowance
- Stitch requirements
- Filling weight
- Accessory details
- Label content
- Packaging method
- Carton quantity
- Inspection standard
Bulk production usually follows material inspection, cutting, decoration, sewing, filling, closing, grooming, inspection, metal detection, and packing.
How Is Plush Fabric Cut?
Fabric cutting begins with inspection and preparation. Plush rolls should be checked for stains, holes, pile defects, color differences, width variation, and backing problems. Fabric rolls from different dye lots may need to be separated to prevent visible shade differences within one toy or one production batch.
Plush fabric is directional. The pile normally lies in one direction, and pattern pieces must follow marked arrows. Wrong pile direction can make a panel appear darker or lighter and can change the way the fur feels when touched.
Cutting controls include:
| Cutting Control | Purpose |
|---|---|
| Pattern version | Prevents old patterns from entering production |
| Pile direction | Maintains consistent color and texture |
| Fabric shade | Prevents mixed dye lots |
| Panel count | Ensures complete sets |
| Matching marks | Supports accurate sewing |
| Embroidery marks | Controls facial placement |
| Defect avoidance | Keeps damaged areas out of finished toys |
| Bundle numbering | Prevents parts from different lots mixing |
Long-pile fabric may be cut from the backing side to reduce damage to the fur. Cutting blades should pass through the backing without removing excessive pile. After cutting, loose fibers may need to be removed before sewing.
Panels are grouped into bundles according to SKU, color, and production line. A character with many small parts requires careful counting because one missing ear, paw pad, or tail panel can stop assembly later.
When Are Details Embroidered?
Facial embroidery, logos, paw marks, and decorative lines are usually added while the fabric remains flat. Flat panels can be secured more accurately in an embroidery frame, allowing better control of position, angle, and tension.
Embroidery planning should confirm:
- Finished embroidery size
- Thread colors
- Stitch type
- Stitch density
- Backing material
- Fabric stretch
- Pile length
- Position references
- Mirror symmetry
- Color sequence
Long-pile fabric may require water-soluble topping or another method to keep fibers from covering the stitches. Dense embroidery on soft fabric can cause puckering, so backing and tension must be adjusted.
Facial embroidery demands close control. Both eyes should be aligned, and the nose and mouth should follow the approved centerline. A small shift may change the character expression.
Embroidery inspection should check:
- Missing stitches
- Loose thread
- Broken thread
- Incorrect color
- Uneven fill
- Distorted shape
- Position error
- Fabric puckering
- Exposed backing
- Unequal left and right features
Appliqué and printed details may also be completed before sewing. Each flat panel should be approved before entering assembly.
How Are Plush Parts Sewn?
Sewing converts flat panels into partial three-dimensional forms. The sequence normally starts with small components, followed by the head, body, limbs, and final joining operations.
A common sewing route includes:
- Sew and turn ears.
- Sew and turn tails.
- Prepare paw pads.
- Assemble muzzle pieces.
- Assemble front and side head panels.
- Attach ears and hair.
- Close the rear head seam.
- Assemble arms and legs.
- Sew belly and back panels.
- Attach limbs to the body.
- Join head and body.
- Leave a filling opening.
- Turn the complete shell.
Curved panels need accurate matching. Notches help operators align the correct points. If one panel is stretched more than another, the seam can twist or create wrinkles.
Seam allowance should remain consistent. A narrow allowance can open during filling or use. An excessively wide allowance can create bulky corners and restrict turning.
High-stress areas may need reinforcement:
| Area | Reinforcement Need |
|---|---|
| Ear base | Repeated stitch or reinforced seam |
| Tail base | Strong attachment seam |
| Arm and leg joint | Secure seam and controlled allowance |
| Clothing loop | Box stitch or repeated stitch |
| Handle or hanging loop | Strong reinforcement |
| Sound-module pocket | Secure closure |
| Weighted inner bag | Double seam where required |
In-line inspection should begin during sewing. Waiting until the whole toy is filled makes seam correction more difficult.
How Is Filling Added?
Filling gives the toy its volume, posture, weight, and touch. Polyester fiber is commonly blown or inserted into the sewn shell, then distributed by hand.
Filling should be controlled by area rather than added as one total amount. The head may need a firmer structure, while the belly may remain softer. The neck may require extra support to hold a large head.
A filling plan can include:
| Body Area | Filling Level | Main Goal |
|---|---|---|
| Head | Medium to firm | Maintain facial shape |
| Muzzle | Controlled firm | Preserve projection |
| Neck | Firm | Support head position |
| Belly | Soft to medium | Comfortable hand feel |
| Arms | Soft | Flexible movement |
| Legs | Medium | Maintain posture |
| Feet | Medium to firm | Support standing or sitting |
| Tail | Light | Avoid pulling body backward |
Total weight should be checked using calibrated scales. Large differences in filling weight can change dimensions, firmness, carton weight, and shipping cost.
Weighted plush products require more detailed control. Pellets or beads should be placed inside a sealed internal bag rather than loose in the main body. The position of the weighted bag affects balance and comfort. A belly weight creates a different feel from weight in the limbs.
Filling openings are closed after shape approval. The closing seam should be neat, secure, and visually hidden where possible.
How Are Plush Toys Finished?
Finishing begins after filling and closing. Operators shape the toy, align the limbs, brush fur away from seams, trim loose threads, clean the surface, dress the product, and check accessories.
Long-pile fur often becomes trapped inside seam lines. Brushing the pile outward hides the seam and restores the intended volume. Facial areas may need additional grooming so the eyes, nose, and mouth remain visible.
Finishing work can include:
- Adjusting head angle
- Reshaping cheeks
- Balancing ear positions
- Aligning arms and legs
- Straightening clothing
- Positioning hats or accessories
- Removing loose fibers
- Cleaning marks
- Trimming thread
- Checking hand-closed seams
- Correcting minor filling distribution
- Confirming labels
Clothing should be checked after the toy is fully filled. A garment that fits an unfilled shell may become tight once the body reaches its final volume.
Packing tests should also be completed during finishing. A toy may look correct before packing but become compressed inside a small box or polybag. Ears, hair, wings, and muzzles are especially vulnerable to deformation.
The approved packing method should protect appearance while controlling carton volume. Paper inserts, tissue, inner supports, or separate accessory packaging may be used for delicate designs.
How Is Plush Toy Quality Controlled?

Plush toy quality control covers materials, cutting, embroidery, sewing, filling, appearance, dimensions, component strength, needle control, packaging, and market compliance. Inspection should occur throughout production, not only after every toy has been completed. Early checks prevent one repeated error from affecting an entire order.
Quality control begins with the approved sample and production specification. Inspectors need clear references for size, fabric, color, facial position, filling weight, accessories, labels, and packaging. Without an agreed standard, decisions can become subjective. One person may consider a soft head acceptable, while another may expect the firmer shape shown in the confirmed sample.
A complete quality file can contain:
- Approved physical sample
- Front, side, and rear photographs
- Finished measurement chart
- Material and color references
- Embroidery artwork
- Filling-weight requirements
- Accessory specifications
- Sewing construction notes
- Label artwork and position
- Packaging instructions
- Carton quantities
- Inspection checklist
- Destination-market requirements
Inspection should be divided into material control, production-line control, finished-product inspection, safety-related checks, and packing verification.
| Inspection Stage | Main Items Checked | Reason |
|---|---|---|
| Incoming materials | Fabric, thread, filling, labels, accessories | Stops incorrect materials before production |
| Cutting | Pattern, pile direction, shade, panel count | Protects shape and color consistency |
| Embroidery | Position, color, stitch quality, symmetry | Controls facial expression and branding |
| Sewing | Seam allowance, alignment, attachments | Prevents open seams and twisted parts |
| Filling | Weight, firmness, distribution, posture | Maintains shape and hand feel |
| Finished product | Dimensions, appearance, cleanliness | Confirms overall product quality |
| Safety control | Small parts, needle control, test preparation | Reduces product and compliance risk |
| Packaging | Labels, bags, boxes, carton marks | Prevents packing and shipping errors |
Delsney applies production checks from material preparation through pre-shipment inspection. Finished products receive full inspection before shipment, while problems found during cutting, embroidery, sewing, or filling are corrected before they continue to later stages.
What Is Checked During Production?
Production inspection focuses on the points where errors can still be corrected efficiently. Inspectors do not wait for a fully filled toy before checking facial embroidery, pile direction, or seam alignment.
Incoming fabric should be reviewed for:
- Correct material type
- Approved pile length
- Fabric width
- Color and dye-lot consistency
- Holes or cuts
- Uneven pile
- Backing defects
- Stains or oil marks
- Excessive odor
- Stretch difference
- Printed-pattern alignment
Filling material should be clean, dry, uniform, and consistent with the approved hand feel. Labels, threads, plastic parts, sound units, clothing, and packaging should also match the approved versions.
During cutting, inspectors verify pattern version, panel dimensions, pile direction, color grouping, and part counts. Old pattern pieces must be removed after revisions. Using one outdated head panel can alter the face across a large number of toys.
During sewing, inspectors check:
- Matching notches
- Seam allowance
- Stitch consistency
- Curved-panel alignment
- Ear and limb position
- Label orientation
- Accessory attachment
- Filling opening
- Exposed fabric edges
- Skipped stitches
- Broken thread
- Puckering
Filling inspection checks both total weight and distribution. Two toys may weigh the same while feeling different when one has too much filling in the head and too little in the body.
Useful production measurements can include:
| Control Item | Measurement Method |
|---|---|
| Total height | From approved top point to lowest point |
| Sitting height | From base to top while naturally seated |
| Head width | Across defined left and right points |
| Eye spacing | Center-to-center measurement |
| Limb length | From attachment seam to end point |
| Product weight | Calibrated scale |
| Filling weight | Controlled before or during insertion |
| Tail position | Distance from approved seam reference |
| Logo size | Finished embroidery or print dimensions |
Measurements should be taken without pulling or stretching the toy. Plush products are soft, so the measuring method must remain consistent between sample approval and bulk inspection.
How Are Seams and Parts Tested?
Seams and attached parts must remain secure during normal handling and reasonably foreseeable use. Weakness often appears around ears, tails, limbs, hanging loops, plastic parts, clothing attachments, and filling openings.
A visual seam inspection checks for:
- Open seams
- Missed stitches
- Loose thread
- Fabric trapped incorrectly
- Narrow seam allowance
- Uneven curves
- Visible raw edges
- Holes around stitch lines
- Poorly closed filling openings
Manual pressure can reveal hidden seam problems. Inspectors gently compress and manipulate the toy while observing whether filling begins to appear through seams.
Attached components may require controlled pull or torque testing according to the product design and target-market requirements. Test planning can cover:
- Plastic eyes
- Plastic noses
- Buttons
- Bells
- Zipper pullers
- Hanging loops
- Fabric ears
- Tails
- Decorative patches
- Clothing fasteners
- Sound-module pockets
For embroidered faces, there are no detachable eye or nose parts, reducing small-component concerns. Embroidery is often preferred for baby plush, small characters, and projects where a clean, durable facial solution is required.
Plastic eyes and noses can create a different visual effect but need secure backing and suitable attachment testing. The surrounding fabric and reinforcement also matter; a strong plastic washer cannot compensate for weak or excessively stretchy fabric.
High-stress areas can use added reinforcement:
| Attachment Area | Common Reinforcement Method |
|---|---|
| Ear base | Repeated seam or reinforced stitching |
| Tail base | Wider seam allowance and repeated stitching |
| Arm or leg joint | Reinforced attachment seam |
| Hanging loop | Box stitch or multiple stitch passes |
| Clothing strap | Bar tack or repeated seam |
| Accessory pocket | Reinforced opening |
| Weighted inner bag | Double seam and separate inspection |
Testing should reflect actual use. A plush keychain may receive repeated pulling from its loop, while a large cushion plush may experience compression and seam pressure. The quality plan should match the product rather than applying one identical test routine to every style.
Is Metal Detection Required?
Metal detection is commonly used as a final safety control for sewn plush products. It helps identify broken needle fragments or other unwanted metal pieces that may remain inside a toy after cutting and sewing.
Metal detection should not replace needle management. A reliable needle-control system records needle issue, use, breakage, fragment recovery, machine checks, and product isolation.
When a sewing needle breaks, production around the affected workstation should be controlled. The operator and supervisor need to locate every fragment before work resumes. Products near the breakage point may need to be isolated and checked separately.
A needle-control procedure can include:
- Record the machine and operator.
- Stop production at the workstation.
- Collect visible needle fragments.
- Compare recovered pieces with a complete needle.
- Search the machine, table, floor, and product.
- Isolate affected work-in-progress.
- Check the isolated products.
- Record replacement needle issue.
- Confirm supervisor approval before restarting.
Metal detectors should be checked using approved test pieces before operation, during scheduled intervals, and after production. Detector sensitivity must match the equipment setup and product characteristics.
Toys containing approved metal parts, sound devices, or electronic modules may require a different inspection route. Metal components should be declared in the specification so they are not confused with unwanted contamination.
Delsney treats needle control and final metal detection as connected systems. Sewing records, broken-needle handling, work-area control, and finished-product screening work together to reduce risk before packing.
Which Safety Standards Apply?
Plush toy safety requirements depend on the destination market, intended age, materials, functions, and accessories. A toy sold in the United States may require a different testing and documentation route from one sold in the European Union, United Kingdom, Japan, South Korea, or another market.
Common compliance frameworks for plush toys include:
- ASTM F963
- CPSIA requirements
- EN 71
- CE-related toy compliance
- UK toy safety requirements
- Market-specific chemical restrictions
- Age-labeling requirements
- Flammability requirements
- Small-parts requirements
- Mechanical and physical testing
- Label and traceability requirements
The exact test plan should be confirmed with a qualified laboratory or compliance specialist based on the product and destination market.
Product features affect the test scope. A simple embroidered plush animal differs from a toy containing:
- Plastic eyes
- Magnets
- Batteries
- Sound modules
- LED lights
- Scented inserts
- Weighted beads
- Removable clothing
- Long cords
- Zippers
- Hard accessories
- Small decorative pieces
Age grading also changes design decisions. Long cords, detachable parts, plastic accessories, and certain fillings may require additional attention for younger age groups.
Compliance planning should begin during design development. Waiting until bulk production is complete can create expensive rework if a component, label, seam, or accessory does not meet the required standard.
A pre-production compliance review can include:
| Compliance Item | Question to Confirm |
|---|---|
| Destination market | Where will the toy be sold? |
| Intended age | Which age group will use it? |
| Product function | Is it decorative, playable, weighted, electronic, or scented? |
| Small parts | Are any detachable parts present? |
| Filling | What material and internal containment are used? |
| Surface materials | Are fabric, thread, ink, and coatings documented? |
| Labels | Are age, care, origin, and warning details correct? |
| Traceability | Can production batches be identified? |
| Packaging | Are warnings and marks placed correctly? |
| Testing | Which laboratory tests are required? |
Delsney can support material documentation, sample preparation, label review, and coordination for market-required testing. Factory experience includes products developed for North American, European, Japanese, Korean, and other international markets.
How Is Packaging Inspected?
Packaging inspection protects product appearance, labeling accuracy, carton strength, and delivery condition. A well-made plush toy can still reach the market in poor condition when the package is too small, the carton is overfilled, or long fur is compressed incorrectly.
Individual packing may include:
- Polybag
- Printed polybag
- Paper band
- Hangtag
- Header card
- Color box
- Window box
- Gift box
- Drawstring bag
- Recycled paper packaging
- Retail display tray
Inspectors should confirm:
- Correct product in the correct package
- Correct SKU and color
- Correct hangtag
- Correct barcode
- Correct care label
- Correct warning label
- Clean package surface
- Proper bag sealing
- Correct box assembly
- No missing accessories
- No severe product compression
Carton inspection should verify:
- Quantity per carton
- Carton dimensions
- Gross weight
- Net weight
- Shipping marks
- Destination information
- Carton strength
- Sealing method
- Internal arrangement
- Mixed-SKU rules
Compression testing is useful before final packing approval. Long ears, wings, hats, muzzles, and hair can remain bent after prolonged packing. Larger toys may recover after unpacking, but dense filling and structured accessories can hold an unwanted shape.
Carton quantity should balance freight efficiency with shape protection. Packing too many pieces may reduce shipping volume while increasing deformation risk. Packing too few raises freight cost and may allow products to move excessively inside the carton.
Delsney reviews packing during sample development and pre-production planning so the package fits the toy rather than forcing the finished toy into an unsuitable format.
How Do You Plan a Plush Toy Order?
Planning a plush toy order requires clear specifications, realistic quantities, approved samples, confirmed materials, compliance requirements, packaging, and delivery timing. Cost and production time become more accurate after the factory understands the character size, structure, fabric, filling, accessories, SKU breakdown, and destination market.
A strong project brief reduces repeated questions and allows the development team to identify technical risks early.
The first inquiry should include:
- Character artwork
- Target size
- Estimated quantity
- Number of designs
- Quantity per design
- Number of colors
- Destination market
- Intended age
- Preferred material
- Filling preference
- Logo and labels
- Clothing or accessories
- Functional elements
- Packaging
- Required delivery date
Providing a target price can also help the factory recommend a suitable construction. A complex character may be possible in several ways. Embroidery, appliqué, printing, separate fabric panels, or molded components can produce similar visual details at different costs.
Projects should move through clear approval points:
| Approval Point | Main Decision |
|---|---|
| Design approval | Character shape and visible details |
| Material approval | Fabric, filling, colors, and accessories |
| Sample approval | Appearance, size, softness, and function |
| Compliance approval | Test plan, labels, and market requirements |
| Packaging approval | Bag, box, hangtag, barcode, and carton |
| Pre-production approval | Final specification and production reference |
| Shipment approval | Inspection result and delivery documents |
No bulk cutting should begin before the main product details are confirmed. Late changes after fabric cutting or embroidery can lead to waste, rework, cost increases, and schedule delays.
What Affects Plush Toy Cost?
Plush toy cost is affected by size, fabric consumption, material type, number of pattern pieces, embroidery, printing, accessories, filling, sewing time, quantity, packaging, testing, and delivery terms.
Product size influences cost, but complexity often matters just as much. A large pillow-shaped plush with four panels may cost less to produce than a smaller character containing thirty panels, layered clothing, several embroidery locations, and small accessories.
Main cost factors include:
| Cost Factor | Why It Changes Price |
|---|---|
| Finished size | Changes fabric, filling, labor, and carton volume |
| Pattern-piece count | More panels require more cutting and sewing |
| Fabric type | Long fur, recycled fabric, and special textiles vary in cost |
| Fabric colors | More colors increase sourcing and cutting complexity |
| Embroidery | Cost rises with size, stitch count, and locations |
| Printing | Setup and color control add work |
| Clothing | Requires separate patterns, materials, and sewing |
| Accessories | Adds sourcing, attachment, and inspection |
| Filling | Weight and material affect cost and shipping |
| Weighted components | Require inner bags and extra control |
| Electronics | Add components, assembly, and testing |
| Order quantity | Affects setup efficiency and material purchasing |
| SKU count | More designs create more setup and sorting |
| Packaging | Boxes and inserts add cost and shipping volume |
| Testing | Depends on product features and destination market |
A quotation based only on a front image is preliminary. Accurate pricing requires enough information to estimate fabric consumption, pattern complexity, embroidery, filling, packing, and production time.
Cost can often be controlled without damaging character identity. Options include:
- Use embroidery instead of small plastic components.
- Reduce hidden pattern pieces.
- Use one shared fabric across several SKUs.
- Select available fabric colors.
- Simplify removable clothing.
- Replace molded accessories with sewn fabric details.
- Use a standard sound module.
- Standardize hangtags and labels across a collection.
- Reduce packaging volume.
- Keep character sizes consistent across multiple designs.
Cost reduction should protect the features people recognize first: face, silhouette, colors, and signature accessories. Removing a hidden seam may be sensible. Reducing eye embroidery quality or using an unsuitable fabric often creates a visible loss in product value.
What Is the Production MOQ?
Plush toy MOQ depends on material availability, product size, design complexity, number of SKUs, color quantities, accessories, packaging, and production setup. Flexible quantities are easier when projects use available fabrics and standard components.
A single character ordered in one color is easier to arrange than the same total quantity divided among many characters.
| Order Plan | Production Effect |
|---|---|
| 1 design × 1,000 pieces | Efficient material and sewing setup |
| 2 designs × 500 pieces | Moderate setup complexity |
| 5 designs × 200 pieces | More patterns, embroidery files, and sorting |
| 10 designs × 100 pieces | High setup work for each SKU |
| Shared fabric across designs | Improves material efficiency |
| Different fabrics for each design | Raises sourcing and inventory pressure |
Delsney’s common custom plush MOQ starts at 500 pieces per design for many projects. The final workable quantity depends on fabric, accessories, electronics, packaging, and customization depth.
Multi-SKU orders can sometimes share materials, filling, labels, and packaging structures. A coordinated collection may therefore be more efficient than several unrelated products.
MOQ also applies to components. Custom fabric dyeing, molded accessories, printed boxes, woven labels, sound modules, and special packaging may have separate supplier minimums.
During early planning, provide both the total quantity and the quantity per character. The production team can then suggest where materials or components may be shared.
How Long Does Production Take?
Plush project timing includes design review, three-view development, pattern making, sample production, sample revisions, material preparation, bulk manufacturing, inspection, packaging, and transportation.
For suitable standard projects, Delsney can prepare the first sample in 5–7 days after specifications and materials are confirmed. Complex products may require 7–15 days.
Bulk production for many standard plush orders can be completed in approximately 20–30 days after sample approval and material readiness. Larger orders, multiple SKUs, special fabrics, electronics, custom packaging, or testing can extend the schedule.
A project schedule may include:
| Project Stage | Planning Range |
|---|---|
| Design review | 1–3 days |
| Three-view or visual development | Based on design complexity |
| Standard sample | 5–7 days |
| Complex sample | 7–15 days |
| Sample revision | Based on change scope |
| Bulk material preparation | Based on stock or custom production |
| Standard bulk production | 20–30 days |
| Testing | Based on laboratory and test scope |
| Final inspection | Before shipment |
| Transport | Based on express, air, sea, or rail method |
The most common causes of delay are not always sewing problems. Delays often come from:
- Incomplete artwork
- Unconfirmed size
- Slow sample feedback
- Repeated design changes
- Custom-dyed fabric
- Unavailable accessories
- Late packaging artwork
- Unconfirmed test requirements
- Changes in SKU quantities
- Late barcode or label information
A consolidated approval system keeps the project moving. Comments should be delivered in one document, with photographs and measurements where needed. The latest approved version should be clearly identified.
Which Factory Capabilities Matter?
A capable plush factory needs more than sewing lines. Product success depends on design interpretation, pattern making, sampling, material control, embroidery, filling, compliance awareness, quality inspection, and communication.
Important capabilities include:
- In-house or closely managed design support
- Experienced plush pattern makers
- Sample technicians
- Three-view development
- 3D visual support
- Material sourcing
- Embroidery and printing coordination
- Multi-material sewing
- Filling control
- Weighted plush experience
- Sound and light module experience
- Clothing and accessory development
- Needle management
- Metal detection
- Quality inspection
- Packaging development
- Export coordination
Factory evaluation questions can include:
- How many years have you made plush products?
- Can you develop from one reference image?
- Can you create front, side, and rear views?
- Can you provide a 3D effect before sampling?
- How long does sample development take?
- How many revisions are included?
- How do you control facial embroidery?
- How do you control filling weight?
- How do you prevent pile-direction errors?
- How do you manage broken needles?
- Do you inspect every finished toy?
- Can you support market testing?
- Can you develop custom packaging?
- Can you manage several SKUs in one order?
- How do you control repeat orders?
A supplier should be able to explain why a design may need adjustment. Automatic agreement with every request is not always a sign of capability. Good engineering sometimes requires changing a tiny part, increasing a seam allowance, replacing a material, or simplifying a component.
Delsney integrates plush research, design, pattern making, sampling, production, quality control, and sales. The factory has more than 18 years of experience and supports international brands, established companies, retailers, distributors, and licensed character projects.
Key production support includes:
- Free design assistance
- Three-view development
- 3D effect support
- Technical-file sampling
- Artwork-based sampling
- Physical-sample reproduction
- 5–7 day standard sampling
- Two free sample revisions
- Flexible MOQ
- Up to 98% design matching
- 20–30 day standard bulk production
- Full pre-shipment inspection
- OEM, ODM, and private-label production
- Custom clothing and accessories
- Custom packaging
- Export shipping support
How Do You Request a Quote?
A useful quote request gives the factory enough information to estimate materials, development work, production time, packaging, and delivery.
Send the following details:
- Character image or technical file
- Required finished size
- Order quantity
- Quantity per design
- Destination country
- Intended age group
- Preferred fabric
- Filling preference
- Logo method
- Clothing
- Accessories
- Sound, light, scent, or weighted function
- Label requirements
- Packaging format
- Target delivery date
A clear inquiry can be written as follows:
“We need a custom 25 cm seated mascot plush based on the attached front and side artwork. The first order will include 2,000 pieces in one design. The face should use embroidery, and the body should feel soft while the neck remains firm enough to support the head. A woven brand label and printed hangtag are required. The products will be sold in the United States. Please recommend suitable fabrics, confirm the sample schedule, MOQ, production lead time, packaging, testing support, and quotation.”
When only a single image or rough idea is available, send it with the target size, quantity, use, and destination market. Delsney can help prepare missing views, recommend construction, select materials, and create the first physical sample.
Start Your Custom Plush Project
A successful plush toy begins with more than attractive artwork. The character must be converted into stable patterns, suitable materials, accurate embroidery, controlled filling, secure seams, compliant labels, and packaging that protects its shape.
Send your design, target size, quantity, destination market, preferred materials, and packaging requirements. The Delsney team can review the concept, prepare three-view drawings or 3D visuals, develop a sample, refine the details, and arrange OEM, ODM, or private-label production.
Contact Delsney to request a custom plush sample, discuss a multi-character collection, or receive a production quotation for your next plush project.